Lesson 1 – FaceGB™ Tuning
Tune your guitar to “FaceGB™

OK, let’s get started. Pull out your tuner and start tuning the strings on your 6-string guitar to FaceGB™. Start with your Bass string and tune according to the chart below:
F – 87 Hz; A – 110 Hz; C – 130 Hz; E – 165 Hz; G – 196 Hz; B – 247 Hz
If you don’t have a guitar tuner, go online to the Google Play store or the Apple store and download one of the guitar tuner apps. Once tuned to FaceGB™ frequencies, you’ll be one step closer to playing beautiful music.
Please note that this tuning will work on any string instrument and make them much, much easier to learn and play. On a 7-String guitar, use FaceGBD™ tuning, and tune the 7th string (D-String) to 294Hz. On an 8-String guitar, use FaceGBDF#™ tuning, and tune the bottom string (F#-String) to 370Hz. As an alternative, you can use DFaceGBD™ tuning on an 8-String guitar and tune the top string (low D-String) to 73 Hz and the bottom string (high D-String) to 294 Hz. The top three strings would then become Minor chords, with the top string (low D-string) becoming a Minor String of reference.
The great thing about “Guitar Playing Made Easy” is that once you learn a form (either Major or Minor) with the root on the chord on a given string, you can play every chord (including sharps and flats) all the way up and down the guitar neck using that one form … the same for Maj7, Min7, Maj9, and Min9 forms … first and second Inversion forms … and advanced Major and Minor chord forms.
GET READY TO HAVE SOME FUN … AND GO ON AN AMAZING JOURNEY!
PLEASE READ THE FOLLOWING IN IT’S ENTIRETY!
With your guitar tuned to FaceGB™, you’re now ready to start playing every chord and every song you could have ever imagined!
Some very important things to learn and remember:
- Initially, you will play only 3-note (3-string) Triads/Chords. You can always add in additional strings later, if you wish.
- To play a 3-note triad/chord, all you need to do is press down/fret (when needed) and strum three consecutive strings. Strum “any” three consecutive strings … “anywhere” on the guitar neck, and you will hear a beautiful “CHORD” ring out! Try it!
- There are four sets of three consecutive strings on a 6-string guitar … strings 1,2,3 … strings 2,3,4 … strings 3,4,5 … and strings 4, 5, 6. On a 7-string guitar, there are five sets of three consecutive strings. The last set being strings 5, 6, 7. On an 8-string guitar, there are six sets of three consecutive strings. The last set being strings 6, 7, and 8.
- The 1st and 3rd strings (F and C strings) are called your “MAJOR” strings. These strings will be your reference points for playing all Major chords. Locate the note (on the scale of either string) that corresponds to the Major chord you want to play; press down on that string and the two underneath; then strum those three strings. It’s that simple. Again, all MAJOR triads/chords are played on either the first set of three consecutive strings, the top strings (F, A, C) … or on the third set of consecutive strings (C, E, G). The F and C strings are also used as reference for Major 7 and Major 9 chords. On a 7-string guitar, the 5th string (G-string) is also considered a “Major” string. The last three strings on a 7-string guitar (G, B, D) make up a G Major chord.
- The 2nd and 4th strings (A and E strings) are called your “MINOR” strings. These strings will be your reference points for playing all Minor chords. Locate the note (on the scale of either string) that corresponds to the Minor chord you want to play; press down on that string and the two underneath; then strum those three strings. Again, all MINOR triads/chords are played on either the 2nd set of three consecutive strings (A, C, E) … or on the fourth set of three consecutive strings (E, G, B). The A and E strings are also used as reference for Minor 7 and Minor 9 chords. On an 8-string guitar, using FaceGBDF#™ tuning, the 6th string (B-string) is also considered a “Minor” string. The last three strings on an 8-String guitar (B, D, F#) make up a B Minor chord.
Let’s start by learning four real common chords: F-Major (F); A-Minor (Am); C-Major (C); and E-Minor (Em). First, strum the top three open strings by themselves a few times. Guess what? You just played a F-Major (F) chord. Then, strum the next three open strings down (2nd, 3rd, and 4th strings). You just played an A-Minor (Am) chord.
Now, strum the next three open strings down (3rd, 4th, and 5th strings). You just played a C-Major (C) chord. Finally, strum the last three open strings down. Welcome to the E-Minor (Em) chord. See how easy guitar playing is with the new FaceGB™ tuning. Now focus on strumming (in order) the C, Am, and F chords only, four times each, until you can transition smoothly between the three chords. Strum each 3-string chord slowly and softly.
I promised to have you playing every major and minor chord within minutes, and by the time you finish the next couple of lessons, you will be. I also promised to have you playing songs within hours. I lied. I’m going to have you play your first song in just a few minutes … “Let It Be”, by the Beatles!
You just learned how to play the open C-Major (C) and F-Major (F) chords, along with the open A-Minor (Am) chord. The only other chord you need to learn, to play this classic song, is the G-Major chord (G).
I’m going to skip ahead a little to lesson 2 and teach you the G-Major chord now. Move up to the 2nd fret on the guitar neck, and use your POINTER finger to press and hold down the 1st 2nd, and 3rd strings (F, A, and C). Strum the top three strings four times very slowly and softly, until you feel comfortable with the new chord. You’ve now learned the G-Major chord and are ready to play “Let it Be”, by the Beatles.
Now, GOOGLE … “Chords and lyrics for Let It Be, by the Beatles”. The search result will display the lyrics. It will also display the Chord Progression (the order in which you play the chords) for the VERSE of the song as C – G – Am – F. Play the verse twice. It will also display the Chord Progression for the CHORUS as Am – G – F – C. Play the chorus once. Repeat this process for each different verse in the song. Strum each chord four times, slowly and softly. Change up your timing between stums and your speed, as needed, to match the original song. Once you feel good with your progress, pull up the song on YouTube and play along.
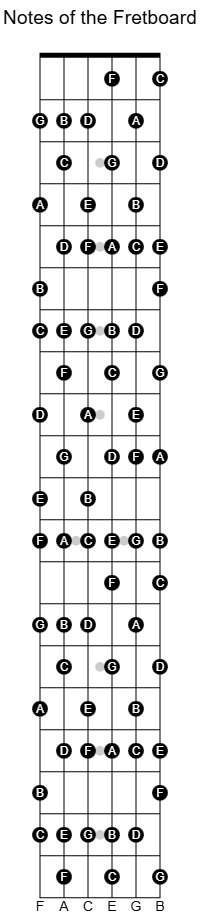
Sharps and Flats Intentionally Omitted to Make the Fretboard Easier to Read